I recently worked on a project that required me to create a documentation portal. But I had an interesting discovery call for the project.
A bit of backstory
My client thought I was just a technical writer and that I didn’t know how to code, let alone use a docs-as-code workflow. During the discovery call, they realised what I could bring to the table, so they opened up.
They wanted a documentation site and the content. Initially, they had assumed that I could help with the content and they would get someone to create their documentation site.
So, I introduced them to the world of docs-as-code, markdown, static site generators, and build pipelines(they were using Azure DevOps for their infrastructure setup). They were happy with my proposal and the work began.
Day after day, new documents kept stacking up. By the end of the project, we had close to 90 files, filled with words, images, markdown, and html tags. But before I handed the project over to them, I had to do the final proofread.
One option was to go through each document page and ensure everything was ok, leaving room for human error in the end. The other option was to use a magical program that could run through all my files and check for any syntactical or grammatical inconsistencies. I had heard of this magic program before — a linter. But, I wasn’t sure which one to choose — ProseLint or vale (check out our article on ProseLint vs Vale).
After fiddling around a bit, I chose vale and I can’t express how happy that decision made me. But there was a hiccup before happiness ensued. I didn’t know how to set it up. So, I have prepared this blog to guide those who got lost like me in setting up vale after installation. Continue reading to learn how to set up vale.
Disclaimer: I installed vale as python package. So, this guide is based on the same assumption that you installed vale’s python package. Also, the following steps are based on vale setup for macOS.
The setup
Step 1: pip install vale
After a quick search, I discovered that some kind samaritans had created a python package to install vale. This made the job cleaner and easier. If you haven’t already, run the following command on your terminal window.
pip install valeOptionally, you can verify the installation by running vale -v in the same terminal window.
Step 2: Create .vale.ini file
If you are one, who ran vale
After a bit of head scratching, I learned that you must create a .vale.ini file in the root directory of your documentation files. So, create a file in the root directory and add the following configuration.
    StylesPath = styles
    MinAlertLevel = suggestion
    Packages = Microsoft

    [*]
    BasedOnStyles = Vale, MicrosoftThere are a few things you can notice in the configuration.
There are a few things you can notice in the configuration.
StylesPath
This is the path that vale looks into for any third party styles. By setting this configuration to styles, you are telling vale to create a new directory — styles — in the root directory. This directory should have the style guide you wish to use.
MinAlertLevel
Setting a value to this configuration is like setting a log level for your logger. It tells vale the minimum severity level that vale should report. The following list shows the acceptable values for this configuration property in the order of their severity.
error— shows only the issues that have error levelwarning— shows the issues that have error and warning levelssuggestion— shows the issues that have error, warning and suggestion levels
Packages
vale offers a list of packages that are readily available for you to use. These packages can be found in vale’s documentation site. If you are just like me, too busy to build your own style guide, you could use one of these packages to get started with vale. I chose Microsoft style guide as suggested by the specifier in the Packages property.
BasedOnStyles
This configuration property tells vale, which style guide(s) to use to check for inconsistencies in your documentation files. This property accepts comma-separated values of style-guide specifiers. Don’t forget to add [*] on top of this property if you want vale to use all styles you have specified.
Now, this is not an exhaustive list of configuration. Check out vale’s documentation site for a complete list.
Step 3: vale sync
The next step is to synchronise vale. When you command vale to synchronise, it downloads the latest version of each Package listed in your .vale.ini file and installs it in the StylesPath directory. Run the following command in the terminal window to sync.
vale sync
The output
Now, you are setup and done. Only one step remains.
Step 4: Run vale
This final step is to run vale. There are multiple ways to run vale. You could run vale on a single file or multiple files at once.
To run vale on a single file, use the following command. Replace <filepath/filename> with the relative path to the file.
vale <filepath/filename>
To run vale on multiple files at once, use the following command
vale .
You will see the output of these commands in the terminal window.
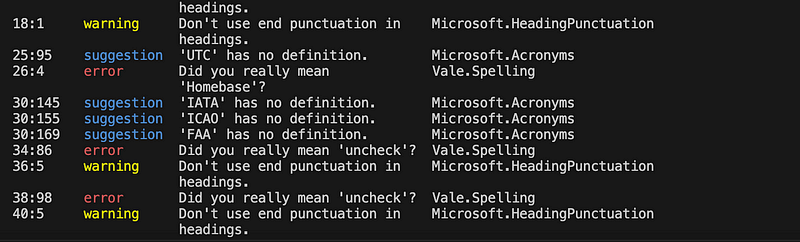
So, there you go. Four simple steps to get you started with vale. I hope this blog helps you set up vale. Happy linting.


